The Pocket Guide to Excellent V-Scoring
FAQ # 8 -- Process Inspection
Practical and Effective V-Score Process Inspection
Since v-scoring occurs virtually at the end of the bare board manufacturing process, after most of the cost and value have been added to it, In-Process Inspection of v-scoring is critical to the success of the V-Scored Product, Board Manufacturer and the Assembler/User. Outlined below are 3 very simple steps (with a 4th suggestion to examine all of the information outlined in our FAQ’s) that should be taken to effectively eliminate the most common problems encountered in the production of v-scored boards. Use them as a guide in developing your own inspection process.
-
INSPECTION OF THE PRESENCE OF A V-SCORE LINE - For whatever reason, sometimes v-scored lines turn up missing on the panel. This, of course, is a catastrophe if not caught before the assembly process. A simple way to check for such missed lines is to place a 'dog bone' type test circuit at each end of the score line as shown below. During electrical test, the circuit will be checked. It should be "Open" to signify the presence of the v-score line. This is a simple and basic, fool-proof way to eliminate the damage that can occur as a result of a missing v-score line.
-
INSPECTION OF THE PLACEMENT ACCURACY OF A V-SCORE LINE - Placement accuracy in the X & Y Axes is very easily monitored by placing a pattern of a set of two square pads approximately 0.040” apart from each other so that the score line will pass directly through the center of the space between them as shown below. This is similar to the dog-bone technique above, actually, both of these techniques can be combined with a combination bog-bone/square pattern as shown. The key here is to be able to use a simple eye-loupe (either with or without a reticle) to quickly and accurately quantify the accuracy of each v-score line to each individual board in the pattern. During the manufacturing process, the cycling of the panel through heat and humidity cycles will almost always yield a panel that, at V-Score, will have (most usually) shrunk. As a result, the v-score lines tend to deviate from the expected position (based on the image) in a linear and progressive fashion in relationship to their distance from the tooling holes used to tool the panel to the V-Score Machine. Again, this technique will help you identify very quickly and accurately, the changes that must be made to the setup, ensuring quality and adherence to the customer specification. Note: this technique and the one outlined in #1 above, can be combined by placing a buss-bar between these two square pads, effectively creating one pattern for both test purposes.
-
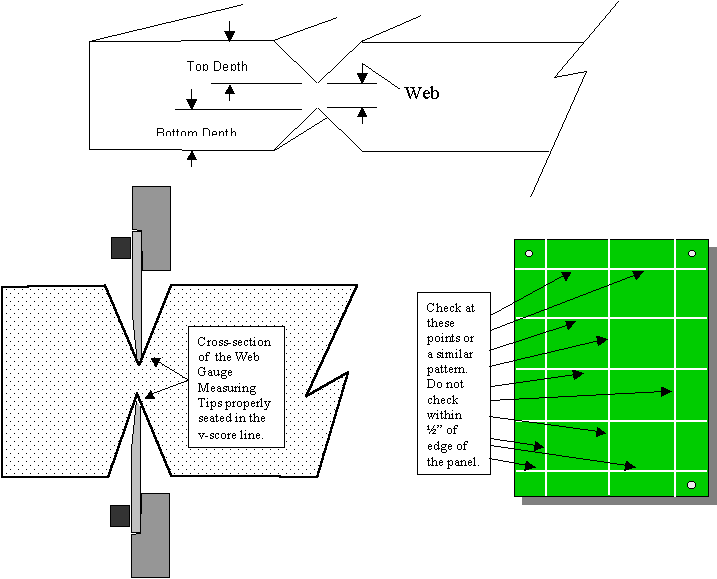
INSPECTION OF THE WEB THICKNESS OF A V-SCORE LINE - The web thickness of a v-score line is extremely important to the overall producability and usability of the PCB. If the web is too thick, it will be too hard to snap (frequently causing component damage). If the web is too thin, it may be too flimsy for the assembly process. As a result, close and frequent inspection of the web is a must. AccuSystems Corporation offers a variety of web checking devices that can help to very quickly and accurately inspect the web thickness by using a direct, non-destructive technique with digital readout accuracy.
The gauges are used as shown below to get a sampling of the web thickness on a panel. It is best to take at least three readings on a panel in different locations, so as to generate a good approximation of the average web thickness, and it’s rough standard deviation. Although no global standards have been set yet, an average web thickness falling in the range of the target dimension +/- 0.002” is acceptable. The standard deviation should be no more than 0.00075”.
-
FOR MORE INFORMATION REGARDING TARGET WEB THICKNESS' AND OTHER V-SCORING FAQ'S -- CLICK ON THE LINK BELOW FOR ADDITIONAL FAQ'S.


